
If you have been putting off exercise because you are worried about pain, injury, or simply feeling too out of shape to start, you are in the right place. This guide is built for complete beginners who want a safe, joint-friendly way to move their bodies at home without spending a dime on equipment. A low impact home workout for beginners does not require you to be coordinated, flexible, or already fit. It only requires you to show up. The routine below keeps at least one foot on the ground at all times, which means no jumping, no jarring impact on your knees and hips, and no intimidating movements. You will find a full warm-up, a simple circuit you can repeat, beginner modifications for every exercise, and a cool-down to leave your body feeling better than when you started. The goal here is not extreme weight loss or dramatic before-and-after photos. The goal is consistency, confidence, and a little more energy every single day.
Table of Contents
- Why Low Impact Workouts Are Perfect for Beginners (2026 Update)
- What You Need to Start Your Low Impact Home Workout
- The 15-Minute Low Impact Home Workout for Beginners (Follow-Along Routine)
- Beginner Modifications to Keep Your Workout Safe and Effective
- How to Progress Your Low Impact Workout Over Time
- Frequently Asked Questions About Low Impact Workouts for Beginners
- Final Thoughts: Your First Step Toward a Healthier 2026
Why Low Impact Workouts Are Perfect for Beginners (2026 Update)
Low impact exercise has quietly become the foundation of sustainable fitness in 2026, and for good reason. The term simply means that one foot stays in contact with the ground at all times, eliminating the pounding that comes with running, jumping jacks, or plyometric drills. For a beginner, this distinction matters more than most people realize.
Joint-friendly movement is the most obvious benefit. Knees, hips, and ankles absorb far less force during a low impact workout, which makes this style of training ideal if you have a history of joint pain, general stiffness from a sedentary lifestyle, or simply a cautious mindset about injury. You can strengthen the muscles that support those joints without aggravating them in the process.
Building a foundation is the second major advantage. When you remove the complexity and speed of high-impact moves, you create space to learn proper form. A bodyweight squat done slowly teaches your hips and knees to track correctly. A standing knee lift done with control builds core stability. These movement patterns become the base upon which every future fitness goal is built, whether that goal is hiking on weekends, keeping up with grandkids, or eventually trying more intense workouts.
Consistency over intensity is the principle that separates people who exercise for a few weeks and quit from those who are still moving a year from now. Low impact workouts are easier to recover from, which means you are less sore the next day and more willing to press play again. That aligns with what fitness researchers and trainers have observed: the number one predictor of long-term success is not how hard you go in a single session, but how often you show up. Low impact removes the dread factor.
Cardiovascular gains without the crash are another underappreciated reality. Steady-state, low-impact movement elevates your heart rate into a moderate zone that improves heart health and stamina without spiking cortisol, the stress hormone that can leave you feeling drained after overly intense sessions. You finish a low impact workout feeling energized, not wrecked.
There is a persistent myth that low impact means low results. That is simply not true. Your heart does not know whether you are jumping or marching; it only knows that it is working. A well-structured low impact circuit can keep your heart rate elevated for the entire session, delivering meaningful cardiovascular and muscular benefits. The difference is that you will be able to walk comfortably the next day and keep coming back.
Is This Workout Right for You? (Safety First)
Before you begin any new exercise program, including the one in this guide, speak with a healthcare professional, especially if you have existing injuries, chronic conditions like arthritis or osteoporosis, or if you are pregnant. This content is for informational purposes only and is not a substitute for individualized medical advice.
As you move through the workout, learn to distinguish between muscle discomfort and joint pain. A burning or shaking sensation in your thighs during squats is normal muscular fatigue. A sharp, stabbing sensation in your knee is not. If you feel joint pain, stop the movement immediately and either modify it or skip it entirely. Taking a modification is not a sign of weakness. It is a sign that you are listening to your body and training intelligently. Modifications are success, not failure.
What You Need to Start Your Low Impact Home Workout
You need almost nothing to begin. This workout uses only your bodyweight, so there is no requirement for dumbbells, resistance bands, or even a yoga mat. If you have a carpeted floor or a towel to stand on, that is helpful but not essential.

Wear comfortable clothing that does not restrict your movement. Sweatpants, shorts, a t-shirt, whatever allows you to move freely. Clear a small space, roughly six feet by six feet, where you can extend your arms and legs without bumping into furniture. Keep a glass of water nearby and sip it during rest breaks.
Set a timer for 15 minutes. That is the full duration of this workout, warm-up and cool-down included. Before you start, remind yourself of a simple phrase that has helped thousands of beginners stick with exercise: progress, not perfection. You are not competing with anyone, not even the version of yourself you think you should be. You are simply moving your body today.
The 15-Minute Low Impact Home Workout for Beginners (Follow-Along Routine)
This workout is structured in three clear sections: a three-minute warm-up, a ten-minute main circuit, and a two-minute cool-down. The main circuit consists of five exercises performed for 30 seconds each, followed by 15 seconds of rest between exercises. You will complete the entire circuit twice, with a 60-second rest between rounds. Every exercise is performed standing, so there is no getting down on the floor unless you choose to during the cool-down.
Part 1: Warm-Up (3 Minutes)
The warm-up prepares your joints and muscles for movement by increasing blood flow and range of motion. Do not skip it, even if you feel ready to jump into the main circuit.
Start with neck rolls and shoulder shrugs for 30 seconds. Slowly roll your head from side to side, never forcing the movement or tilting backward. At the same time, lift your shoulders toward your ears, hold for a moment, then release them down. This releases tension that many people carry in the upper body.
Move into arm circles for the next 30 seconds. Extend your arms out to the sides and make small circles forward for 15 seconds, then reverse direction. Keep the circles controlled and the movement coming from your shoulder joints, not your neck.
Spend a full 60 seconds marching in place. Lift your knees to a comfortable height, whatever that means for your body today. Swing your arms naturally as if you were walking. Focus on breathing deeply and rhythmically through your nose.
Finish the warm-up with 60 seconds of hip circles and ankle rotations. Place your hands on your hips and make slow, deliberate circles with your pelvis, as if you were using a hula hoop. After about 30 seconds, shift your attention to your ankles. Lift one foot slightly off the ground and rotate the ankle gently in both directions, then switch sides.
Part 2: Main Circuit (10 Minutes, 2 Rounds)
You will perform each of the following five exercises for 30 seconds, followed by 15 seconds of rest. After completing all five, rest for 60 seconds, then repeat the entire circuit one more time.
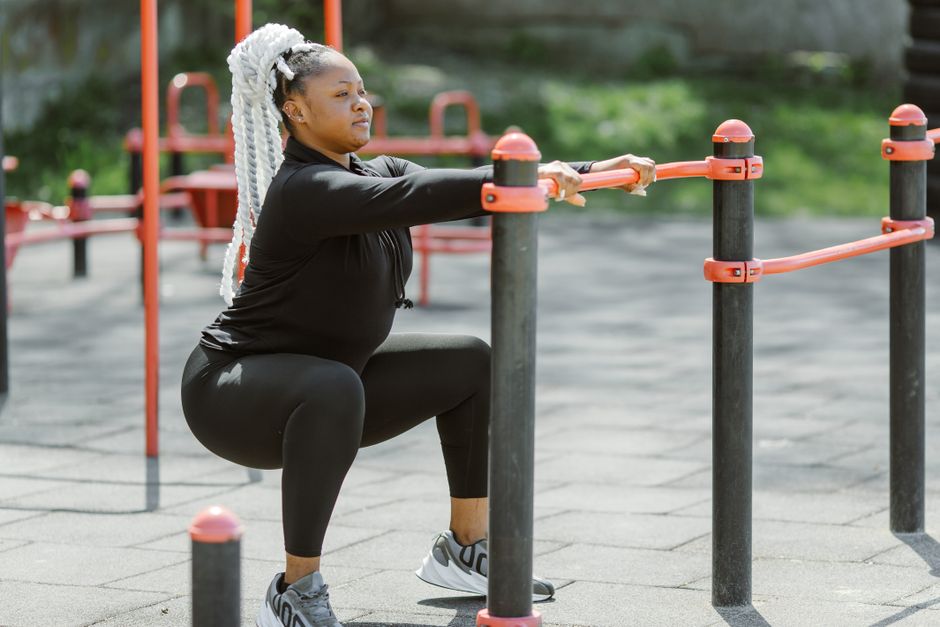
Begin with bodyweight squats. Stand with your feet hip-width apart, toes pointing forward or slightly outward. Keeping your chest lifted and your weight in your heels, sit your hips back as if you are reaching for a chair behind you. Lower only as far as is comfortable. If you need support, place a sturdy chair in front of you and hold the backrest for balance. A shallow squat done with good form is far better than a deep squat done poorly.
After your 15-second rest, move into standing knee lifts. Stand tall with your feet hip-width apart. Alternate lifting one knee toward your chest, engaging your abdominal muscles as you lift. Keep your torso upright and avoid leaning back. If lifting the knee high feels challenging, lift only to waist height. Slowing the pace also makes the movement more controlled and effective.
Next are side leg raises. Stand behind a sturdy chair or next to a wall and place one hand on it for balance. Keeping your standing leg slightly bent, lift the opposite leg out to the side with the toe pointing forward, not up. Lift only as high as you can without tilting your torso. Even a six-inch lift engages the hip muscles effectively. Perform all reps on one side for 15 seconds, then switch to the other leg for the remaining 15 seconds.
Follow with heel raises, also known as calf raises. Stand tall with your feet hip-width apart. Slowly rise onto the balls of your feet, lifting your heels as high as comfortable, then lower back down with control. Hold onto a wall or chair if you feel unsteady. This exercise strengthens the calves and ankles and improves balance over time.
Finish each round with standing glute kicks. Stand tall and hold onto a wall or chair for support. Keeping your hips square and your standing knee soft, squeeze your glute to kick one leg straight back. The movement should come from the hip, not the lower back. Kick back only a few inches if that is all you can manage while maintaining good posture. The squeeze matters more than the height. Alternate legs throughout the 30-second interval.
After completing all five exercises, take a full 60 seconds to rest. Shake out your arms and legs, take a sip of water, and breathe deeply. Then repeat the entire circuit one more time.
Part 3: Cool-Down and Stretch (2 Minutes)
Cooling down helps your heart rate return to normal gradually and prevents stiffness later. Move through these stretches gently, never forcing a position.
Begin with a forward fold for 30 seconds. Stand with your feet hip-width apart, hinge at your hips, and let your upper body hang forward. Bend your knees as much as you need to. Let your arms dangle and your neck relax completely. Feel the gentle release in your lower back and hamstrings.
Move into a standing quad stretch, spending 30 seconds on each side. Hold onto a wall or chair with one hand. Bend your opposite knee and bring your heel toward your glute. Reach back with your free hand and hold your ankle gently. Keep your knees close together and avoid arching your lower back. If you cannot reach your ankle, simply bend the knee and hold the position without grabbing.
Perform a chest opener for 30 seconds. Clasp your hands behind your back, straighten your arms as much as is comfortable, and gently lift your chest toward the ceiling. You should feel a stretch across the front of your shoulders and chest, areas that tighten from sitting and daily stress.
Finish with 30 seconds of deep breathing. Stand tall with your eyes closed. Inhale slowly through your nose for a count of four, hold for a moment, then exhale through your mouth for a count of four. Let your shoulders drop and your jaw relax. This moment of stillness signals to your nervous system that the workout is complete and recovery has begun.
Beginner Modifications to Keep Your Workout Safe and Effective
Every exercise in this routine can be adjusted to match your current fitness level. Using modifications does not make the workout less effective. It makes it appropriate for your body, which is exactly what a smart training program does.
Reducing your range of motion is the simplest and most powerful modification available. A micro-squat, where you lower only a few inches, still activates your quadriceps and glutes. A mini leg lift still engages your hip muscles. The goal is movement, not depth. Over time, your range will naturally increase.
Slowing down the tempo increases time under tension, which builds strength, and reduces the risk of losing your balance. Perform each rep deliberately. A slow squat or a controlled knee lift is more challenging for your muscles and safer for your joints than rushing through the movement.
Using a wall or chair for balance is encouraged, not discouraged. For any single-leg exercise, including knee lifts, side leg raises, and glute kicks, keep one hand on a stable surface. This allows you to focus on the working muscles without worrying about tipping over.
Taking extra rest is always an option. If 15 seconds between exercises does not feel like enough, pause and rest for 30 seconds or longer. The workout will still be effective. Your body does not know you took an extra 15 seconds. It only knows that you kept going.
Focus on form, not speed. If possible, position yourself near a mirror so you can check your alignment. Your knees should track over your toes during squats, not collapse inward. Your torso should stay upright during knee lifts, not lean backward. Proper alignment prevents injury and ensures the right muscles are doing the work.
How to Progress Your Low Impact Workout Over Time
Your body adapts to exercise, which means a routine that feels challenging today will eventually feel easier. When that happens, you can progress the workout gradually rather than abandoning it for something completely different.
During weeks one and two, complete this 15-minute routine three times per week, with at least one rest day between sessions. Your only goal during this period is to master the form of each exercise and build the habit of showing up.
During weeks three and four, increase your frequency to four times per week. You can also add a third round to the main circuit, extending the workout by about five minutes. Only do this if the two-round version feels manageable and your form remains solid throughout.
During weeks five and six, increase the work interval to 40 seconds per exercise while keeping the rest at 15 seconds. Alternatively, add a new low-impact exercise to the circuit, such as standing side bends or toe taps on a low step. Small additions prevent plateaus without overwhelming you.
From week seven onward, consider combining this routine with a second short low-impact circuit from the Home Workout Videos library. Alternating between different routines keeps things interesting and challenges your body in new ways. The key principle is that progress should be slow and steady. Only increase difficulty when your current level feels genuinely easy with perfect form.
Frequently Asked Questions About Low Impact Workouts for Beginners
Are low-impact workouts good for weight loss? Yes, they can be. While low-impact workouts may burn slightly fewer calories per minute than high-impact alternatives, they allow for longer sessions and more frequent training because they are easier to recover from. Sustainable calorie burn over time matters far more than a single intense session that leaves you too sore to move for a week.
How often should a beginner do low-impact workouts? Aim for three to four sessions per week, with at least one rest day between each. Your muscles and joints need time to recover and adapt, especially when you are new to exercise. Listening to your body is more important than sticking rigidly to a schedule.
Can low-impact workouts build muscle? Yes, particularly for beginners. Bodyweight exercises like squats, lunges, and glute kicks provide enough resistance to build strength and muscular endurance in the lower body. As you progress, you may eventually want to add resistance, but bodyweight alone is effective for months.
Do I need special shoes? No. Training barefoot on a carpeted surface or wearing flat, supportive sneakers works well. Avoid running shoes with thick, cushioned heels, as they can make balancing during standing exercises more difficult.
What if I feel pain during the workout? Stop immediately. Muscle fatigue feels like burning, shaking, or a deep ache in the belly of the muscle. Joint pain feels sharp, stabbing, or grinding. If you experience joint pain, modify the movement to reduce the range of motion or skip that exercise entirely and move on to the next one.
Final Thoughts: Your First Step Toward a Healthier 2026
This low impact home workout for beginners is not about transforming your body in 30 days or pushing through pain. It is about proving to yourself that you can show up, move safely, and feel good afterward. The only comparison worth making is to the person you were yesterday.
Bookmark this page so you can return to it. Try the workout today, even if you only complete the warm-up and one round of the circuit. That counts. Then explore the rest of the Home Workout Videos library, where you will find more low-impact routines designed to meet you exactly where you are. Building a consistent movement practice is one of the most reliable ways to support your long-term health, and you have already taken the first step by reading this guide.
This content is for informational purposes only and is not a substitute for professional medical advice, diagnosis, or treatment. Always consult a qualified healthcare provider before beginning a new exercise program, particularly if you have pre-existing injuries, medical conditions, or concerns about your physical readiness.